If you are looking for a way to neatly sew together two pieces of knitwork, the mattress stitch is such a pretty solution. This way of sewing knitwork is certainly worth to learn and it is not difficult at all.
What do you use for the mattress stitch?
You can use the cast on yarn end that is already attached to your work for the sewing. If that yarn end is not long enough, you might also just start with that and continue with a new piece of yarn later. It is best to use the same yarn or at least the same color as your knitwork, but for clarity, I use a contrasting color. Thread your chosen yarn through a blunt needle.
Placing of the seam
For this example, I knitted two pieces of stockinette of 15 stitches wide. However, in the process of sewing the pieces together, the stitches on the edge will be lost, leaving 14 stitches on each side. So, if you are planning a project, that is something to take into account.
To see where your seam is going to be, you lay your pieces of knitting next to each other with the good sides up. For stockinette, the good side is the one with the knit stitches. The edges are always a bit messy and you look for the first column of nice looking V’s, that is closest to the edge, on both pieces of your knitwork (see photo). The goal is to connect these columns side by side and the messy edge will not be visible anymore. If it helps you to keep an eye on the right columns, you can mark both of them with stitch markers.

Figure 8 join
First, you need to connect the two pieces of knitting. A neat way to do that is the figure 8 join, that looks like an 8 when you are done. Follow the instructions in the photos below.
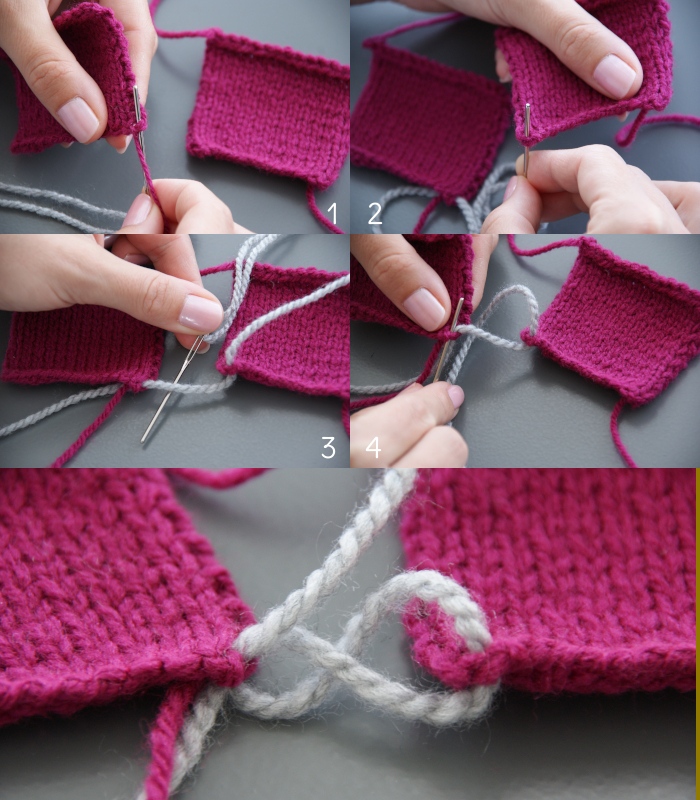
Step by step figure 8 join
1 Insert your needle from bottom to top through the corner of the left piece of knitwork. That is directly to the right of your first nice looking V. Pull the yarn through, but leave a tail. (You can skip this step if you are using the cast on yarn end that is already attached.)
2 Then do the same for your right piece of knitwork. Again, insert from bottom to top, but now directly to the left of your first V. Pull the yarn through, but leave some space between the two pieces of knitwork, about an inch will do.
3 Take your yarn up and behind the yarn that is now connecting your pieces.
4 Then insert your needle in the exactly the same way and place as step 1. Again, pull the yarn through, but leave about an inch or so between your two pieces of knitwork. That’s it. Your pieces are connected and you should now be able to see the shape of an 8 in your yarn.
Mattress stitch
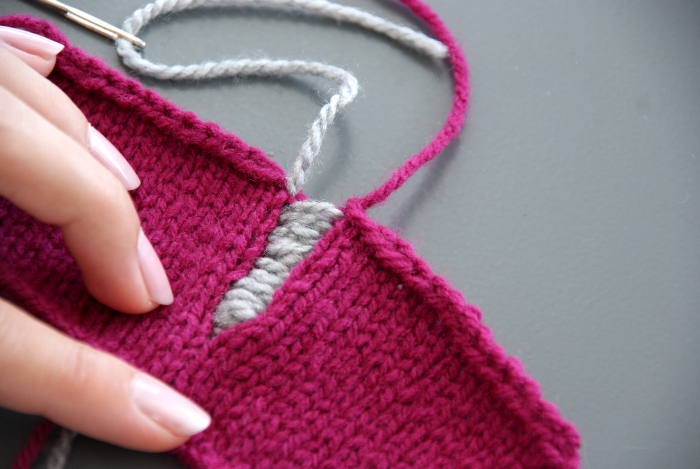
From here you begin the actual mattress stitch. When you look closely, there are little horizontal bars, connecting two adjacent V’s. You usually have to pull on your work a bit to see them. In the photo below, I put my needle under a whole bunch of them to show you where they are. It is like a ladder next to the V’s.
For the mattress stitch, you will connect the ladders next to your neat columns of V’s to each other. For your left piece of knitwork, it is the ladder to the right of your column, so the side that is closest to the edge. For your right piece of knitwork, it is the ladder to the left of your column. You connect the ladders one step at a time, like so:

Step by step mattress stitch
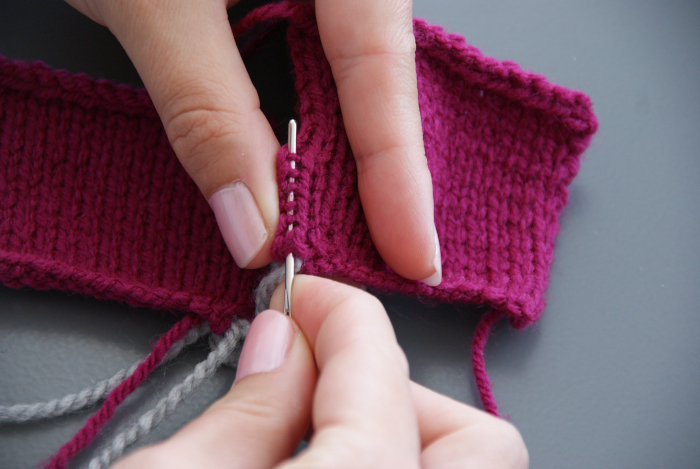
1 Insert your needle from bottom to top under the first bar on the right piece of knitwork. Pull the yarn through, but always leave a bit of space between the pieces of knitwork.
2 Insert your needle from bottom to top under the first bar on the left piece of knitwork.
3 Keep going like that and move one step up. Go under the next bar on the right. Then under the next bar on the left. Make sure you do not skip a bar.
4 Every so often, carefully pull the yarn completely through. Then, the gap between the two pieces of yarn closes and you can see the V’s lining up perfectly. Do not pull tighter than is necessary, or your work will buckle.
5 Continue to connect the next bunch of bars in the same way. In this example, that is already until the end of the knitwork.
6 Carefully close the gap again. You can do this by pulling the yarn at the end where the needle is or piece by piece, by alternating skipping a few of the connecting yarns and then pulling one. For the latter method, you do not have to pull as hard and you can leave the top section loose, which makes it easier to continue seaming the next section, if you are not at the end of your seam yet.
7 When you are done, the seam is completely invisible on the front!
8 On the backside, the seam is visible as a neat ridge. It is a good place to weave in your yarn ends.
I hope the mattress stitch helps you to make your knitting projects even prettier than they already are.