Besides written instructions, you might also find a knitting chart to show you how a knitting project is made. If you can read patterns visually in a chart, it can be a much quicker and easier method for you to follow the pattern, especially when the pattern becomes increasingly complicated. If you are new to knitting charts, here is how it works.
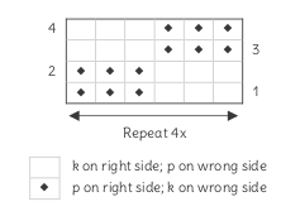
Example of a knitting chart
Ambiguous symbols
The chart shows the pattern from the right side. Because rows are knitted on both the right and wrong side of your work, symbols are ambiguous. What is a knit stitch (k) on the right side is a purl stitch (p) on the wrong side and the other way around.
Reading the chart in both ways
You read the chart from the bottom to top, which might seem odd, but is the same direction as your work proceeds. All the rows on the right side are read from the right to the left, because this is the direction in which they are knitted as well.
So for this pattern, the first row you knit is on the right side and you start reading on the right side, where it says ´1´, which means ´row 1´. Start to knit 3 stitches and then purl 3 stitches. You reached the end of the pattern on the left side of the chart, but as you can see underneath, you are supposed to repeat each row of the chart 4 times. So keep repeating the first row until you have all 24 stitches. You turn your work and now proceed by knitting the second row on the wrong side.
All the rows on the wrong side are read from the left tot the right. The symbols have changed meaning now. You knit 3 stitches and then purl 3 stitches until you reach the end of the chart on the right side. Again, repeat the row 4 times and the second row is done.
And that’s how you do it
To read a knitting chart takes a bit of getting used to, but it is not as difficult as it seems. Just carefully read all the information in and around the chart. You can do it!