Welcome back! With your current knowledge, you can already start a simple crochet project. Today, you will learn how to read a pattern and you will receive your very first crochet pattern.
If you are new and want to take a look at the previous lessons first, you can find those here.
Crochet abbreviations and symbols
Up till now, your lessons contained fully written out stitch names. In patterns, stitches are mostly abbreviated or shown in a chart with symbols. Some patterns are written out while others are visual. Sometimes you even find combinations of these. In this lesson, you will learn about reading patterns both ways.
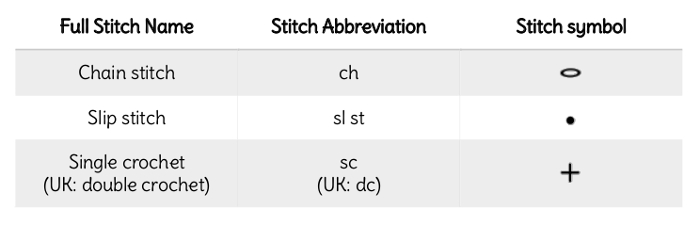
The stitches you have learned so far have both abbreviations and symbols:
Crochet language and terminology
In your first free crochet pattern below, I will use the US terminology. In the Home of Yarns shop, every pattern is available in four languages: US English, UK English, German and Dutch. If you can use some help translating this free pattern to your language, you can use the article on Crochet Terminology.
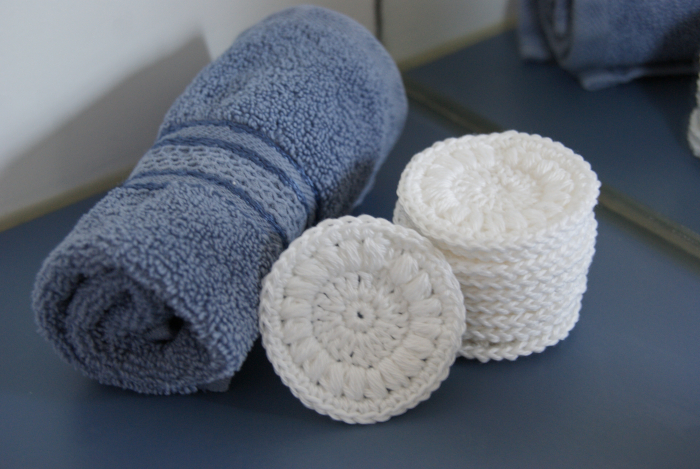
Free crochet pattern for simple face scrubbie
With this free crochet pattern, you can make yourself a simple face scrubbie. You can use any yarn you want while you are learning, but if you want to use it as a scrubbie 100 % cotton fine yarn is recommended. On the yarn label, you can find information on what size crochet hook to use for your chosen yarn.

If you would like to know more about face scrubbies and how to use them, you can read about it here.
First, the written pattern:
My first crochet pattern for simple face scrubbie
To begin ch 4, join with sl st to form a ring
(this means you should start with a chain of 4 chain stitches and make a slip stitch in the first chain stitch to form a ring)
Round 1 Ch 1, 6 sc in ring, sl st in first ch (6)
(this means 1 chain stitch and then 6 single crochet stitches in the ring, which is the space in the center of chain stitches of the beginning. So you can ignore the individual stitches of the ring and just insert your hook into the big center hole. You close the round by making a sl st in the first ch. The (6) at the end, means this round consists of 6 stitches. The starting chain and the slip stitch are thus ignored here. To make it easier, you can mark the first chain stitch in every round with a stitch marker. If you don’t have a stitch marker, you can also use a safety pin or a piece of yarn with a contrasting color and pull that halfway through the stitch. This way, you can easily find the stitch where the slip stitch needs to be made)
Round 2 Ch 1, [2 sc in the next stitch] 6 x, sl st in first ch (12)
(that’s right, you can make more than one stitch in every stitch. Just insert your hook in the same stitch again. This is called ‘increasing’. Be sure to insert your hook through both loops of the stitch)
Round 3 Ch 1, [sc in the next stitch, 2 sc in the next stitch] 6x, sl st in first ch (18)
(Increase every other stitch)
Round 4 Ch 1, [2 sc in the next stitch, sc in each of the next 2 stitches] 6x, sl st in first ch (24)
(Increases are now further apart each round in order to get a flat circle)
Round 5 Ch 1, [sc in each of the next 3 stitches , 2 sc in the next stitch] 6x, sl st in first ch (30)
Round 6 Ch 1, [sc in each of the next 2 stitches , 2 sc in the next stitch, sc in each of the next 2 stitches] 6x, sl st in first ch (36)
Fasten off and weave in yarn ends.
(After you made your last stitch, cut off the yarn and pull the yarn end through the loop on your hook, Then use a yarn needle to weave in both yarn ends; one at the center and one at the outer edge.)
Without the extra explanations, the written out pattern looks like this:
Crochet pattern for simple face scrubbie
ch 4, join with sl st to form a ring
Round 1 Ch 1, 6 sc in ring, sl st in first ch (6)
Round 2 Ch 1, [2 sc in the next stitch] 6 x, sl st in first ch (12)
Round 3 Ch 1,[sc in the next stitch, 2 sc in the next stitch] 6x, sl st in first ch (18)
Round 4 Ch 1,[2 sc in the next stitch, sc in each of the next 2 stitches] 6x, sl st in first ch (24)
Round 5 Ch 1,[sc in each of the next 3 stitches , 2 sc in the next stitch] 6x, sl st in first ch (30)
Round 6 Ch 1,[sc in each of the next 2 stitches , 2 sc in the next stitch, sc in each of the next 2 stitches] 6x, sl st in first ch (36)
Fasten off and weave in yarn ends.
Visual crochet pattern
Instead of written patterns, you could also find crochet charts. Visual patterns like that do not use words to explain the patterns, but symbols in a chart to show you what to do. The pattern above looks like this:
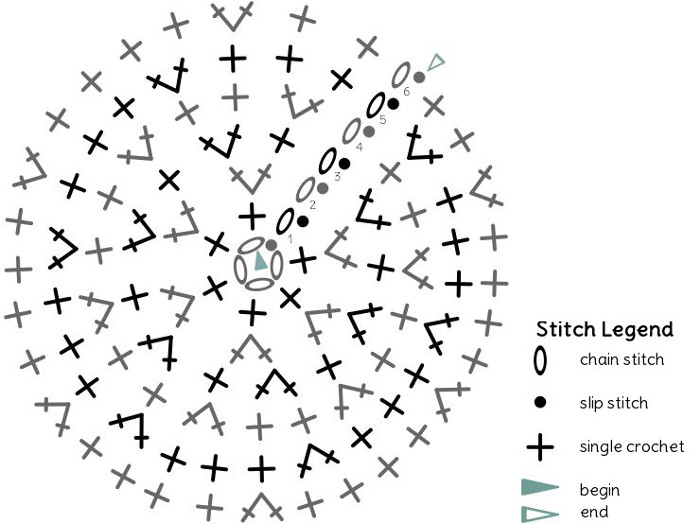
Start reading in the middle. You start crocheting in where the begin-arrow is and read the chart counter clockwise, because that is the direction in which you work your stitches. With each round, you move towards the outer edge of the chart, until you reach the end-arrow. Compare the chart with the written instructions and you will find out that they are exactly the same.
Did you manage to make your own scrubbie? Congratulations! I would love to see it. Send me a picture!
Now that you know the basics, there is still much to learn: more stitches and techniques to make it better. Stay tuned for your next crochet lesson.