
A little while back, I wrote an article about the cable cast on method. The method I am writing about here, is very similar to that, yet produces a very different edge for your knitting. It is called the knitted cast on. Here are step by step instructions to learn this casting on method.
Knitted cast on – step by step
The first part of this casting on method is exactly the same as for the cable cast on method. You start by making a slip knot and place it on your left knitting needle. This knot already counts as your first stitch. If you like some help making a slip knot, here are the step by step instructions.
Just like the cable cast on method, you will use the right needle to cast on the stitches. Insert your right needle into the loop of the slip knot as if you would make a knit stitch. Yarn over and pull up a loop. Pull the loop longer and transfer it to your left needle from back to front (see pictures). I find it helpful to think of the right needle rotating clockwise so I can insert the left needle in the back of the loop. Then, pull the loop smaller so that it lies neatly next to the slip knot. Now you have two stitches already.
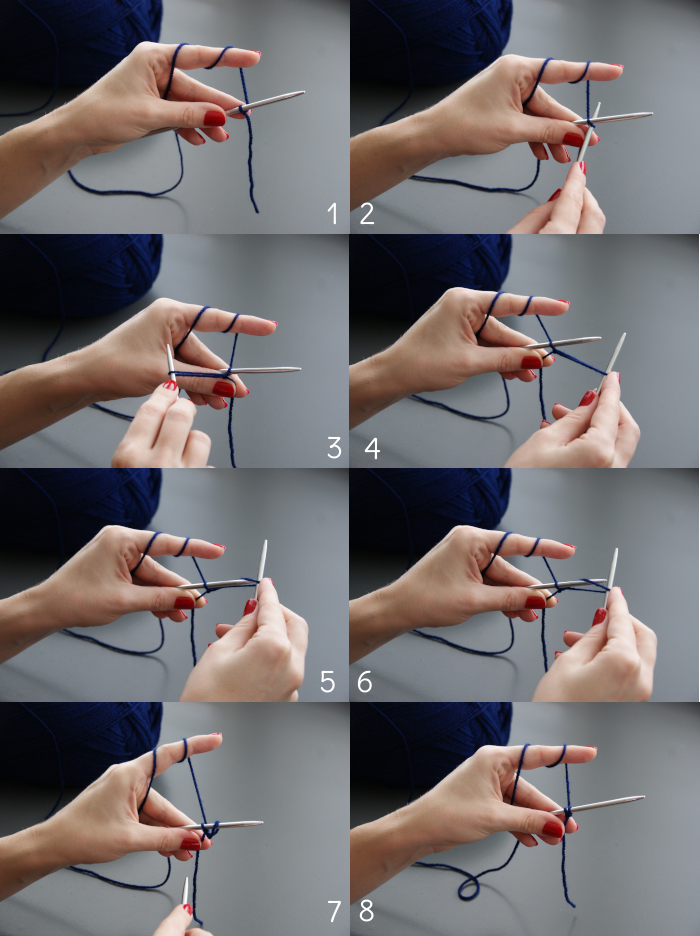
1 Place a slip knot on your left needle and hold as if to make a knit stitch
2-3 Insert your right needle into the slip knot as if to make a knit stitch, yarn over and pull up a loop
4-6 Pull the loop larger and transfer it to the left needle from back to front
7-8 Pull tight. There is your new stitch
As you may have noticed, this first part of the cast on method was exactly the same as the cable cast on, but from here the placement of the right needle will be different. Easier, actually.
For the next and all following stitches you repeat the exact same steps. Each time, you insert your right needle into the newest stitch on the left needle, as if to knit. You keep scooping up yarn as if to knit and add it to the left needle.

9 For all following stitches, insert the needle through the newest stitch as if to knit
10-12 Just repeat the same steps as before
Pros and cons
Like the cable cast on method, the knitted cast on method does not require a prior estimation of the lenght of the tail end as for the long tail cast on method.
Since this method is so similar to the knit stitch, it is quite easy to learn. It is also potentially a very fast method. For clarity, I took out my right needle in the pictures to show you how I pulled the newest stitch into place. In reality, you don’t even have to take your right needle out of the stitch. Just pull tight and continue!
This method produces a very loose edge, not looking as neat compared to the firm edge of the cable cast on method. In terms of elasticity, it is in between the long tail cast on and the cable cast on. These particular features can be useful for loose projects, that do not require a firm or elastic edge.